


Introduction
Welcome to the Angles software support documentation. The following documentation is the best source of information and learning.
This documentation was last updated on 28 September 2023. It is very out of date, we are working on this!
Please start by reading over this documentation and watching the screencasts. If you can't find your answer here; send an email to support@fulcrumtec.com. This will create a case in our system that we will respond to within 6 hours. This approach is best if you want to document your question and trace accountability for the response.
As part of your annual subscription, direct call and messaging contacts during normal business hours are below. All of us can be reached via Messages, WhatsApp and Skype.
ANZ (English speaking)
| Name | Phone Number | Skype |
|---|---|---|
| Rex Proctor | +61 448 048 793 | rexproctor |
| Mat Knight | +61 434 589 055 |
UK (English speaking)
| Name | Phone Number | Skype |
|---|---|---|
| Tom Shanks | +44 7725 911821 | |
| Dane Williams | +44 7876 668460 |
USA (English speaking)
| Name | Phone Number | Skype |
|---|---|---|
| Matt Marlow | +1 434 962 0341 | matthewcmarlow |
| Fulcrum USA | +1 214 256 5659 |
EU (Spanish, Italian and English speaking)
| Name | Phone Number | Skype |
|---|---|---|
| Juan Iturralde | +54 9 11 6621 1503 | |
| Juan Traverso | +34 653 430 263 |
CENTRAL & SOUTH AMERICA (Spanish and English speaking)
| Name | Phone Number | Skype |
|---|---|---|
| Santiago Cuenya | +54 9 11 4410 8924 | scuenya |
| Juan Iturralde | +54 9 11 6621 1503 | |
| Juan Traverso | +34 653 430 263 |
Download
Get the latest version from the link below.
ANGLES Build #1079 Release Notes
Getting Started
Installation
Install the application by double clicking the dmg file, downloaded from the link above, then dragging and dropping the Angles app into your /Applications folder.
License Registration
License Registration & De-registration
The account details used to log into this online documentation are the same ones used to register and deregister Angles.
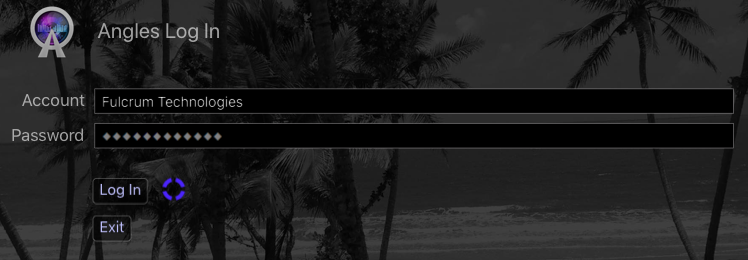
When you first launch Angles, you will be prompted to log in:
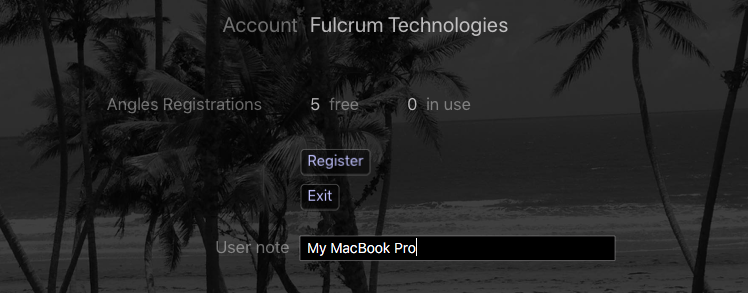
Once, logged in you will see how many registrations are free and in use.

Your Workspace
Workspace Overview
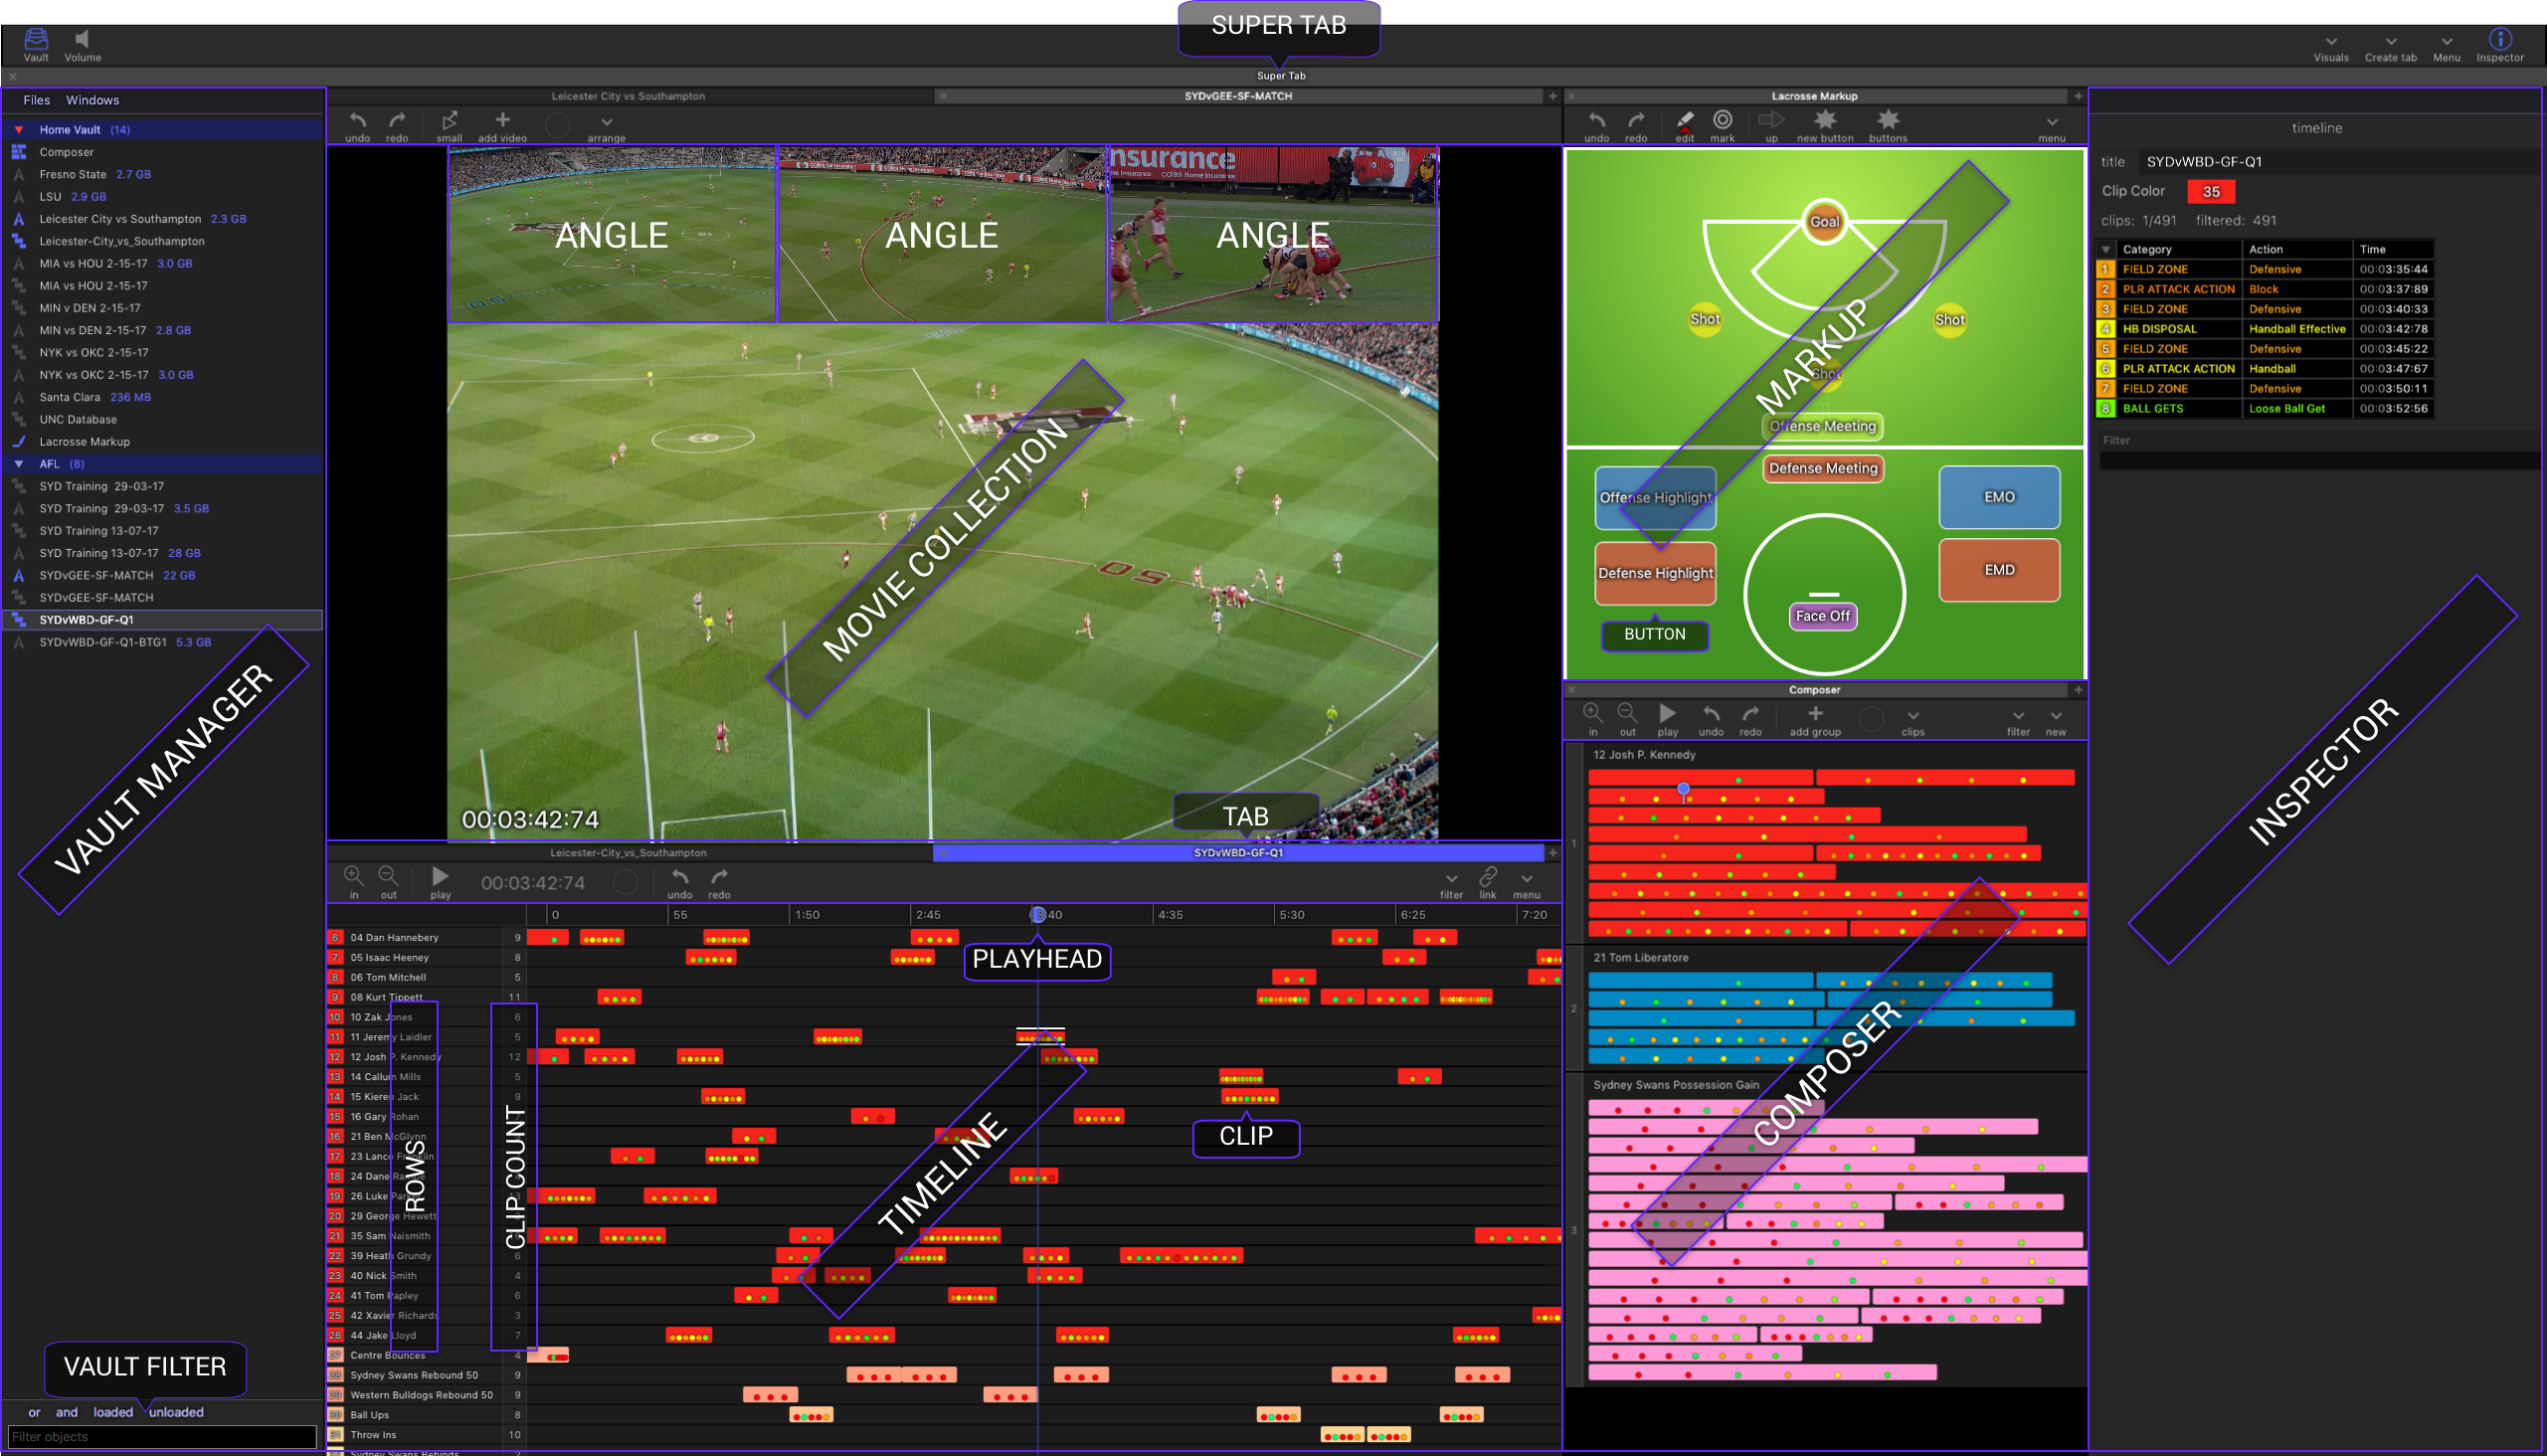
Angles has a very flexible and modern interface that allows you to setup your workspace according to how you work in various contexts. You may wish to have a specific arrangement when live capturing and marking up OR you may be working on a longer term project and want to keep specific files open and ready to be worked on whenever you want.
Your workspace will be contained within a window, you can organise a window to work in different contexts or projects using Super Tabs, then within those Super Tabs you can split up the window into separate Panes; where each Pane has a file(s) open in separate Tabs. You can, also, use multiple windows in a similar way if you don't like the super tab approach.
A window has several key areas:
- Main toolbar (top of window)
- Super Tabs (strip below main toolbar)
- Super Tab Body (main body of window)
- Files List and Windows Manager (left sidebar)
- Inspector (right sidebar)
To create multiple windows, choose File > New Window. Windows can be managed in the Windows section in the left sidebar. Open windows will have a tick next to them in the list. When closing a window using the red button in the upper left corner of the window, the tick will disappear. The window can be opened by double clicking the box next to the name or choosing File > Open All Windows. Windows can also be closed by right clicking on the window in the list and choosing Close Window.
To remove a window, right click on the window in the Windows list of the left hand sidebar and choose Remove Window.
Getting Started
This video shows a quick workflow using some of the core features.
This video discusses 2 important features of the Angles interface, Super Tabs and Folders
Short Cuts
There are many shortcuts and learning them can make you very proficient while using Angles.
General
| Key | Name | Action |
|---|---|---|
| ⌘ | Command | Hold down and click to select multiple objects. |
| ⌘ A | Command A | Select all objects in selected tab. |
| ⌃ | Control | Hold down and left mouse click on object to view right click contextual menu. |
| ⌘F | Command F | Zooms movie to full screen in new Space. Press again to escape. |
| ⌥⌘F | Option Command F | Zooms selected tab to full window. |
| ⌃` | Control Tilde | Zoom window to full screen. |
| ⎋ | Escape | Escapes from full window. |
| ⌥ | Option | Hold down option to move an edge of a pane independently when pane edges are aligned and locked. |
| ⌘N | Command N | Create a new window. |
| ⌃⌘N | Control Command N | Creates a new vault and sets the focus to the vault. |
| ⌘W | Command W | Closes window. Use to close full screen presentation. |
| ⇧⌘W | Shift Command W | Closes top Super Tab immediately. |
| ⌘X | Command X | Cut |
| ⌘C | Command C | Copy |
| ⌘V | Command V | Paste |
| ⌘Z | Command Z | Undo |
| ⇧⌘Z | Shift Command Z | Redo |
| ⌃D | Control D | Deselects all. |
| ⌘M | Command M | Minimises window. |
| ⌘T | Command T | Show Fonts, use for Notes. |
| ⇧⌘C | Shift Command C | Show Colors, use for Notes. |
| ⌃⌘␣ | Control Command Space Bar | Emojis Palette. |
| Left ⌘⌘ | Double Left Command | Tap twice rapidly to show or hide Content Sidebar. |
| Right ⌘⌘ | Double Right Command | Tap twice rapidly to show or hide Inspector Sidebar. |
| Left ⌃⌃ | Double Left Control | Tap twice rapidly to show or hide clip hover over details. |
| ⇧⌃⌥ | Shift Control Option | Hold down to use Quick Drag Linking, links timelines to movies, matrices and tables. |
| ⌃⌥␣ | Control Option Space Bar | Plays or pauses movie when cursor is in a text box. |
| ⌃⌥← | Control Option Left Arrow | Rewinds movie when cursor is in a text box. |
| ⌃⌥→ | Control Option Right Arrow | Fast forwards movie when cursor is in a text box. |
Content Sidebar
| Key | Name | Action |
|---|---|---|
| ⇧ | Shift | Hold down to select range of files. |
| ⌘ | Command | Hold down to select files. |
| ⌘⌫ | Command Delete | Deletes the selected files. |
| ⌥ | Option | Hold down and click on vault disclosure triangle to open or close all vaults. |
| ⌥ | Option | Hold down and double click on vault title to set focus vault. |
Movie Collections
In order for these shortcuts to work, a timeline must be linked to the collection or a composer with clips linked to the collection.
| Key | Name | Action |
|---|---|---|
| ␣ | Space Bar | Plays and pauses movie. |
| ↑ | Up Arrow | Plays and pauses movie. Rapidly tap to increment play speed. When play speed is 2x or above, up arrow drops back to play, tap again to pause. |
| ⌥↑ | Option Up Arrow | Rapidly tap to decrement play speed. When play speed is below 1x, up arrow drops back to play, tap again to pause. |
| ↓ | Down Arrow | Loops playhead back to last paused location. |
| ← | Left Arrow | Rewinds movie with acceleration. |
| → | Right Arrow | Fast forwards movie with acceleration. |
| ⌥← | Option Left Arrow | Rewinds movie slowly. |
| ⌥→ | Option Right Arrow | Fast forwards movie slowly. |
| , | Comma | Jumps 3 seconds backward This is customizable in Keyboard Controlsplist |
| . | Period | Jump 3 seconds forward This is customizable in Keyboard Controls plist |
| ⌃⌥⌘↑ | Control Option Command Up Arrow | Sets current playback speed as preference, so it can be reinstated by pressing Command Up Arrow. |
| ⌘↑ | Command Up Arrow | Plays movie at speed set by Control Option Command Up Arrow. |
| ⌥ | Option | Hold down then click and drag from middle or edge of angle or overlay to move position. |
| ⌥ | Option | Hold down then click and drag from corner or edge of angle or overlay to resize. |
| 0 | Zero | Press to cycle through stored arrangements. |
| 1,2,3... | Numbers | Press the number keys to flick angles. This is customizable in Keyboard Angle Shortcuts.plist |
| ⌥ | Option | When an angle is zoomed and a clip is selected in a timeline or composer, hold down option then click and drag on angle to lock zoomed angle of selected clip. |
| ⇧⌃ | Shift Control | Hold down and click on movie to display movie information. |
| ⌘ | Command | Holding down Command will accelerate angle start offset adjustments. |
| ⌘ | Command | Hold down and scroll up and down on top of overlay to change opacity. |
| Mouse | Scroll up and down on top of overlay to scale text. | |
| ⌥⌘O | Option Command O | Toggle overlays on or off. |
| ⇧⌥⌘O | Shift Option Command O | Apply Stored Overlay Pattern. |
Timeline
| Key | Name | Action |
|---|---|---|
| ⇧ | Shift | Hold down and mouse scroll over timeline body to move horizontally. |
| ⇧ | Shift | Hold down and click to select range of rows. |
| ⇧ | Shift | Hold down and click and drag on clip to edit. |
| ⇧⌘ | Shift Command | Hold down and click and drag on clip edge to merge into adjacent clip. |
| ⇧ | Shift | Hold down and drag playhead to select clips that intersect with timeline cursor. |
| ⌘ | Command | Hold down and scroll up and down using trackpad or mouse wheel to zoom timeline. |
| ⌘ | Command | Hold down and click and drag in timeline body to select clips using rectangular marquee selection tool. |
| ⌥⌘ | Command | Hold down and click and drag in timeline body to select clips using lasso selection tool. Lasso must cross a corner of a clip in order to select clip. |
| ⇧⌃ | Shift Control | Hold down and click and drag in timeline row to insert clip. |
| ⇧← | Shift Left Arrow | Select clip, press shift + left arrow to set playhead to start time, keep shift depressed and tap left and right arrow to adjust. |
| ⇧→ | Shift Right Arrow | Select clip, press shift + right arrow to set playhead to end time, keep shift depressed and tap left and right arrow to adjust. |
| ⌥⌘< | Option Command < | Subtracts from start time for selected clips, adjusting start time to the left. |
| ⇧⌥⌘< | Shift Option Command < | Adds to start time for selected clips, adjusting start time to the right. |
| ⌥⌘> | Option Command > | Subtracts from end time for selected clips, adjusting end time to the left. |
| ⇧⌥⌘> | Shift Option Command > | Adds to end time for selected clips, adjusting end time to the right. |
| ⇧⌥⌘P | Shift Option Command P | Splits clip at clip cursor. |
| ⇥ | Tab | Move to start of next clip in selected row(s). |
| ⇧⇥ | Shift Tab | Move to start of previous clip in selected row(s). |
| ⌃⇥ | Control Tab | Move to next qualifier in clip in selected row(s). |
| ⇧⌃⇥ | Shift Control Tab | Move to previous qualifier in clip in selected row(s). |
| ⌥ | Option | Hold down, click and drag a clip to copy/merge to another row. |
| Left ⌃⌃ | Double Left Control | Rapidly tap control twice or show clip hover over details. |
| ⌃D | Control D | Deselect all clips. |
| ⌘L | Command L | Lock angle positions for selected clip. |
| ⌘E | Command E | Cuts selected clips to folder selected in cut clip settings. |
| ⌃ 1,2,3... | Control 1,2,3... | Flick and lock angle position for selected clip. |
| ⌥⌘V | Option Command V | Copy clip to existing row in composer. |
| ⌃⌥⌘V | Control Option Command V | Copy clip to new row in composer. |
| ⌥⌘B | Option Command B | Copy selected clips to existing row in composer. |
| ⌃⌥⌘B | Control Option Command B | Copy selected clips to new row in composer. |
| ⌥⌘N | Option Command N | Copy selected clips as numbered topics in composer. |
| ⌃J | Control J | Rewinds movie with acceleration. |
| ⌃K | Control K | Plays and pauses movie. Rapidly tap to increment play speed. When play speed is 2x or above, up arrow drops back to play, tap again to pause. |
| ⌃L | Control L | Fast forwards movie with acceleration. |
| ⌃T | Control T | Sets closest start or end time for selected clip according to playhead location. |
| ⌃I | Control I | Sets start time for selected clip according to playhead location. |
| ⌃O | Control O | Sets end time for selected clip according to playhead location. |
| ⇧⌃I | Shift Control I | Move to start time and decrease start time while holding down. Keep Shift Control down and press O to increase start time. |
| ⇧⌃O | Shift Control O | Move to end time and increase end time while holding down. Keep Shift Control down and press I to decrease end time. |
| ⌘J | Command J | During capture, jumps playhead to live capture edge, turning playhead red. |
| ␣ | Space Bar | During capture while playhead is red, drops playhead 2 seconds behind live capture edge. |
| ⌃⌥↑ | Control Option Up Arrow | Move clip cursor up rows. |
| ⌃⌥↓ | Control Option Down Arrow | Move clip cursor down rows. |
| ⇧⌥J | Control Option J | Move clip cursor up rows. |
| ⇧⌥L | Control Option L | Move clip cursor down rows. |
| ⌃R | Control R | Add new row. |
| ⌃S | Control S | Selects closest clip to the clip cursor. |
| ⇧⌃S | Shift Control S | Selects the previous closest clip to the clip cursor. |
| ⌃ ⏎ | Control Return | Sets the text cursor in the first note type for the selected clip. |
| ⌃N | Control N | Selects closest clip to the clip cursor and sets the text cursor in the first note type. |
| ⇧⌃N | Shift Control N | Selects the previous closest clip to the clip cursor and sets the text cursor in the first note type. |
| ⌃Z | Control Z | Quick zoom in and out. Set zoom views by right clicking on zoom in and out buttons in toolbar. |
| ⇧⌃⌥ | Shift Control Option | Hold down and drag from timeline ruler to another timeline ruler to link playheads. |
| ⇧⌃⌥ | Shift Control Option | Hold down and drag from timeline body to movie collection ruler to link movie. |
| ⇧⌃⌥ | Shift Control Option | Hold down and drag from timeline body to link to any type of table. |
| ⌃⌥⌘E | Control Option Command E | Opens JSON export dialog or triggers JSON export of front timeline. |
| ⌃⌥⌘I | Control Option Command I | Opens JSON import dialog. |
| ⇧⌃⌥ | Shift Control Option | Hold down, then click and drag from body of Timeline to a movie collection to link. |
| ⇧⌃⌥ | Shift Control Option | Hold down, then click and drag from body of Timeline to a MarkUp body. The MarkUp will only mark clips in linked timeline. Repeat linking motion to unlink. |
Composer
| Key | Name | Action |
|---|---|---|
| ⌘ | Command | Hold down and scroll up and down using trackpad or mouse wheel to zoom clips. |
| ⌘ | Command | Hold down and click on clips to select. |
| ⇧ | Shift | Hold down and click on clips to select a range. |
| ⌘ | Command | Hold down and click on row topic number to select multiple topic rows. |
| ⇧ | Shift | Hold down and click on row topic number to select a range of topic rows. |
| ⌘ | Command | Hold down to move selected clips to another location. |
| ⌥ | Option | Hold down to copy and move selected clips to another location. |
| ⌘X | Command X | Cuts selected clips. |
| ⌘C | Command C | Copies selected clips. |
| ⌘V | Command V | Pastes cut or copied clips. |
| ⌃Z | Control Z | Quick zoom in and out. Set zoom views by right clicking on zoom in and out buttons in toolbar. |
| ⌃R | Control R | Add new topic. |
| ⇧ | Shift | Hold down and click and drag on clip to trim or lengthen. |
| ⇧← | Shift Left Arrow | Select clip, press shift + left arrow to set playhead to start time, keep shift depressed and tap left and right arrow to adjust. |
| ⇧→ | Shift Right Arrow | Select clip, press shift + right arrow to set playhead to end time, keep shift depressed and tap left and right arrow to adjust. |
| ⇥ | Tab | Move to start of next clip from playhead location. |
| ⇤ | Shift Tab | Move to start of previous clip from playhead location. |
| + | Plus | Bump active clip star rating up. |
| - | Minus | Bump active clip star rating down. |
| ⌥ | Option Click and Drag | Copy selected clips. |
| ⇧ | Shift | Hold down and mouse scroll over composer body to move horizontally. |
| ⌃ 1,2,3... | Control 1,2,3... | Flick and lock angle position for selected clip. |
| Left ⌃⌃ | Double Left Control | Rapidly tap control twice or show clip hover over details. |
| ⌘L | Command L | Lock angle positions for selected clip. |
| ⌃D | Control D | Deselect all clips. |
| ⌘⌥ | Command Option | Hold down and scroll over picture to alter size of preview thumbnail. |
| ⌥⌘P | Option Command P | Splits clip at clip cursor and inserts picture clip. |
| ⇧⌥⌘P | Shift Option Command P | Splits clip at clip cursor. |
| ⌥⌘< | Option Command < | Steps selected clips start times backwards in time. |
| ⇧⌥⌘< | Shift Option Command < | Steps selected clips end times forwards in time. |
| ⌥⌘> | Option Command > | Steps selected clips start times forwards in time. |
| ⇧⌥⌘> | Shift Option Command > | Steps selected clips end times backwards in time. |
| ⌃T | Control T | Sets closest start or end time for selected clip according to clip cursor location. |
| ⌃I | Control I | Sets start time for selected clip according to clip cursor location. |
| ⌃O | Control O | Sets end time for selected clip according to cursor location. |
| ⌃S | Control S | Selects closest clip to the clip cursor. |
| ⇧⌃S | Shift Control S | Selects the previous closest clip to the clip cursor. |
| ⌃ ⏎ | Control Return | Sets the text cursor in the first note type for the selected clip. |
| ⌃N | Control N | Selects closest clip to the clip cursor and sets the text cursor in the first note type. |
| ⇧⌃N | Control N | Selects the previous closest clip to the clip cursor and sets the text cursor in the first note type. |
| ⇧⌃⌥ | Shift Control Option | Hold down, then click and drag from a clip to a movie collection to create a new link. |
MarkUp
| Key | Name | Action |
|---|---|---|
| ⌥ | Option | Hold down then click and drag to copy selected buttons. |
| ⌘C | Command C | Copy selected buttons. |
| ⌘V | Command V | Paste copied buttons. |
| ←↑↓→ | Arrows | Moves selected button(s). |
| ⌥←↑↓→ | Option Arrows | Moves selected buttons(s) with high precision. |
| ⌃⌥←↑↓→ | Control Option Arrows | When a button is selected, holding down Control Option, then pressing an arrow key will select the closest button in that direction. |
| ⇧ | Shift | Hold down and click and drag on knob to resize while maintaining aspect ratio. |
| ⇧⌃ | Shift Control | Hold down and click and drag on know to resize using original size and scale. |
| ⇥ | Tab | Pushes all buttons up, ending all marking clips while in MarkUp mode. |
| ⌃⇤ | Control Tab | Pushes all buttons down that were last pushed up using Tab key shortcut. |
| ⌥⌃ | Option Control | Hold down and click on a qualifier to insert qualifier in all selected clips. |
| ⌃⌘ | Control Command | Use in Qualifier Mode to add qualifier to multiple selected clips. |
| ⌃⌥⌘ | Control Option Command | Use in Qualifier Mode to add qualifier to multiple selected clips, forcing duplicates. |
| ⌘ | Command | Hold down to unlink a button from an action in the link list of the inspector. |
| ⌘ | Command | While a clip is selected in MarkUp mode, hold down to add duplicate qualifiers to clip. |
| ⌃ | Control | Hold down to pause button action links animation. |
| ⌃⌥ | Control Option | Hold down, then click and drag on button name or shortcut to move them. |
| ⌘ | Command | Hold down to use the last cartesian value again. |
| ⇧⌃⌥ | Shift Control Option | Hold down, then click and drag from body of MarkUp to a timeline body. The MarkUp will only mark clips in linked timeline. Repeat linking motion to unlink. |
Angles uses key codes in some of the customizable shortcuts. Refer to this image for the key codes:
The movie below demonstrates some of the more advanced keyboard shortcuts.
Content Sidebar
File and window management is handled in the Content Sidebar. The Content Sidebar can be shown or hidden by clicking on the Content icon in the main window toolbar or by double tapping the left Command key.
There are three tabs in the Content Sidebar: Vaults, Recent Files and Windows.
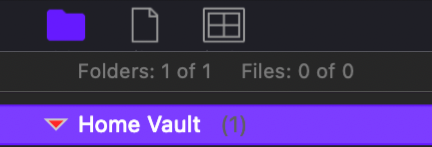
The Files List is the left most tab in the sidebar and can be shown by clicking on the folder icon. The Files List shows all vaults and their contents. Inside a vault, all the various file types are stored such as timelines, movie collections, markups or composers.
An Angles Vault is a special MacOS folder that behaves like a single file; sometimes this is called a package. The benefit of the vault system is that files are stored in the vault and managed by the software. Since vaults are treated like a single file, they are easily shared.
A default Home Vault is created in the user's Movies folder and always appears at the top of the Files List.
The first time Angles is launched, the Home Vault will be the focus vault. The disclosure triangle to the left of the vault name is red which indicates that it is the focus vault. The focus vault is where all new files will be created and saved.
Vaults can be created for various purposes: a vault can be created for a specific project, used to help organise files into separate topics or archiving files on a file server. They can be created on any storage device or file server.
Creating Vaults
To create a vault, choose File > Create New Vault or right click in the Files List and choose Create New Vault. When you create a new vault, the focus will be set to this new vault. A red disclosure arrow will indicate the focus vault.
Files can be copied from vault to vault by dragging and dropping files between them. When a file is dragged within the Files List, the list of vaults will collapse and an animated circle will indicate which vault will be the target for the copy.
Focus Vault
The focus vault is where all new files will be saved. So, it is important to pay attention to which vault is the focus vault. The focus vault's disclosure triangle will be red.
Adding Vaults
To add an existing vault to the Files List, double click on it in Finder or choose File > Add An Existing Vault To Files List, then navigate to the vault and select it. This will add the vault to the search path. To remove it, right click on the vault and choose Remove Vault From Content Sidebar.
A common usage of folders is to create them on a shared file server, then copy files across, so that other people can use or copy the files into their folders.
When a vault is not accessible, the background of the folder will be red, indicating it cannot be found. This will happen if the storage device or server is not connected to the computer or the vault has been moved or deleted.
File Filtering
Files in vaults can be filtered using the filter text box at the bottom of the Files List. The filtering works using the file names, so it is important to think about a naming convention that will make this powerful and flexible.
File list example:
Seattle v Arizona
Seattle v Dallas
Dallas v Denver
Dallas v Texas
Buttons are located above the text input: or | and | loaded | unloaded
OR When OR is selected, text separated by a space will filter the files list by the boolean OR operation.
Inputting "Seattle Texas" in the filter input box will filter the file list like this:
Seattle v Arizona
Seattle v Dallas
Dallas v Texas
AND
When AND is selected, text separated by a space will filter the files list by
the boolean AND operation.
Inputting "Seattle Texas" in the filter input box will filter the file list like this:
Seattle v Texas
LOADED Selecting loaded will show only files that are loaded in any of the super tabs in the window.
UNLOADED Selecting unloaded will show only files that are not loaded in any of the super tabs in the window.
Movies
Movies can be imported or captured using a variety of USB and Thunderbolt devices. But, more often than not, you will be importing movies that were downloaded from the internet.
Angles supports the following movie common formats: MP4 encoded using H.264, MJPEG or ProRes MOV encoded using H.264, MJPEG or ProRes
Movie Toolbar
Full Play
Full play button toggles full play mode. When Full is set the movie will be presented in full window when the movie is played; pressing ESC on the keyboard will escape full window presentation.
Add Video
Pressing the add video button adds a movie to the collection. This is useful when pasting HLS stream URLs into the collection.
Movie Import
Movie Angles Importing and Synchronizing
The quickest way to get started importing a movie is to create a new movie and timeline super tab. Click on the Super Tab menu in the window toolbar and select New Movie and Timeline Super Tab. Drag and drop a movie into the collection, then link the timeline.
A movie collection can be created in any pane by clicking on the plus button. Once an empty collection is open, drag drop the movie into the collection.
Append Movies
Dragging and dropping a movie onto an exsiting angle will give you the option to append it to the angle.
Capturing Movies
To capture video from a device like a FaceTime camera or USB device, chooose New Capture Super Tab from the Super Tab menu in the main window toolbar.
This will create a new super tab with an empty timeline and movie collection along with the capture and and empty view. The empty view is used to drop in a markup from the file list in the folder.
Right click on the capture view to set the audio video sources and capture settings. All the settings will be saved and used the next time that a new capture super tab is created.
Click on the camera icon in the capture toolbar to start capturing into the open movie collection below the capture view. Press the camera icon to stop capture. Starting and stopping will continually append the capture to the movie collection.
When capture is initiated, the playhead in the timeline will be red and the collection will not visibily update. When the playhead is red, press markup buttons will mark clips and qualifiers based on this time.
During capture, the playhead can be dragged back and forth to review the capturing file. This is useful to setup delayed review or mark clips behind the capture with more accuracy and content.
In the movie collection, there is a red number next to the time counter, this number indicates how far the collection is behind the live capture edge.
Manipulating Angles
Multiple Angles
Multiple movies can be dragged and dropped at the same time. For example, you may have 3 angles for a performance, dragging them all in at the same time will import 3 angles that can be viewed. See synchronising angles if you need to align the start times of the angles.
Synchronising Angles
Angles in a collection can be sychronized by adjusting the start time offsets for the movies. To do this, Select "Adjust Start Time Offsets" from the Arrange menu in the movie collection toolbar.
Hold down Option and click on the plus or minus button to reset the offset to zero.
Setting Angles Positions
Angles can be arranged in the movie collection by holding down Option, then clicking and dragging from the center of the angle.
Clicking and dragging from the corners of the angle while holding down shift will resize the angle.
To help to align angles, right click on an angle and choosing Average n angles. The n will be the number of angles in the collection. Depending on the angle arrangement, this will align them vertically or horizontally or a quad type arrangement.
When there are 4 angles, specific preset options will be available.
The angle positions are stored in the timeline, timeline clip or composer clip. So, it is possible to have 3 different arrangements going on at the same time while working with a movie collection.
The default arrangement is the timeline and is the arrangement shown when no clips are selected in either a timeline or composer. Any changes to this arrangement will become the default, no saving or setting is necessary.
By selecting a single clip in the timeline or composer, the arrangement can be set by simply moving the angles around. When the clip arrangement is set the clip will have a dotted line along the top.
Double tapping zero will average the angle sizes and align them using a best guess method according to their locations.
Remove Angle Positions
The arrangement and zooms can be removed by right clicking on the clip and choosing Remove Angle Positions For Clip.
Flicking Angles
In a collection with multiple angles, each angle can be flicked, so it is the only angle in view in the collection.
The angles are numbered as they are added to a movie collection. The first angles will be 1, the second will be 2, etc.
The flicked angle can be locked in for clip playback by: - Right clicking on the clip and choosing Set Angle Positions For Clip - While clip is selected press Command L - pressing Control while flicking the angle shortcut key 1,2,3,4...
By flicking and locking, clips can show the preferred angle when played. This is especially useful in the Composer. The neat thing about this is that the angles can still be flicked.
Angle Numbers
An angle number is assigned automatically when it is added to the movie collection. However, you may want to change this. To do this, right click on the angle and choose a number from the Angle Number options.
Zooming and Panning
Any angle can be zoomed and panned for close up viewing. Hover over an angle movie with the mouse cursor and scroll using the trackpad or wheel on mouse.
To pan the zoom, hold down Shift and click drag to move the angle movie.
Quick Clip Zooming
Select a clip in a timeline or composer. Pan and zoom, then right click on the angle and choose "Set Zoom To Current View".
This locks in the zoomed angle position for the entire length of the clip.
Clip Zooms
Clips movies can be zoomed and panned according to keyframes. Select a clip and choose Edit Zooms from the Arrange menu in the movie toolbar.
Using the zoom control located at the top of the angle, drag the playhead to the location of the first zoom and hit the Plus button on the right side of the zoom control.
Adjust the position of the zoom rectangle by clicking and dragging from the center of the zoom rectangle.
Adjust the size of the zoom rectangle by clicking and dragging on the perimeter of the zoom rectangle.
To add another zoom, deselect any zoom rectangles by clicking in an empty area of the movie, set the playhead to the new location then click the plus button.
The zoom will start from the beginning of the clip, fully zoomed out and then it will zoom in to the size of the first zoom, then the second zoom, etc. until it zooms back to fully zoomed out.
To flick and locked or zoom from a clip, right click on the clip and choose "Remove Angle Position For Clip".
Exporting Movies From A Collection
When a movie is in a collection, you may want to export it. To export a movie, open the collection, then right click on the angle and select "Copy angle movie to desktop". The movie file will be copied to the desktop.
Alternatively, you can right click on the angle and choose "Reveal movie data". This will open up the file location in Finder. The movie will likely have a name like video 0000000001.mov, just copy this by holding down OPTION and dragging the file to a new location or copy and paste it, then rename it accordingly.
Timelines
The timeline is where data is stored about a linked movie. Watch this video to learn about some of the basic features.
Creating a timeline could not be easier, there are two ways to do this:
- If there is an empty tab open in a pane, click the timeline button.
- Click the plus button located in right side of the tab strip, from the menu choose add a timeline tab.
Timeline Toolbar

The timeline toolbar.
Linking Timelines
Drag from the timeline toolbar to the movie collection to create a link between a timeline and movie collection. Quick drag linking is another way of linking, hold down Shift Control Option and drag from the timeline body to the movie collection.
Clicking on the link button in the timeline toolbar will display a green check in the linked movie collection. Clicking on the link button in a movie collection will display a green check in the visible linked timelines and this will flash clips in composers that are linked to the movie collection too.
There are two types of links, strong and weak. A strong link is one that you set explicitly by dragging from the timeline to the movie collection. A weak link occurs automagically when a timeline is not strongly linked to any collection. The timeline will look for the first collection and control the movie collection.
Import and Export Timelines
To export a timeline, choose Copy timeline to desktop from the menu tool in the timeline toolbar. This creates a timeline package on the desktop that can be shared.
To import a timeline, create a new timeline and drag drop the timeline package onto it.
A timeline can be populated using the popular SportsCode XML format. Many online video exchange platforms and desktop analysis use this format as a means of interchanging timeline data.
If you have downloaded or exported this format of XML, importing it into a timeline is as simple as dragging the file from Finder and dropping it into a newly created timeline. See imports for more details.
Slipping Clips
When timeline data has been imported, the clips may not align with the movie.
To align the clips, select the clips to be aligned, right click on an empty section of the timeline body and choose Slip Selected Clips.
Refer to shortcuts for selecting clips
While the Slip Clips dialog is present, clicking and dragging in the timeline body will move the clips back and forth.
Close the dialog to stop slipping and save the changes. Remember to use Undo if you want to go back.
Clip Adjustments
Selected clip start and end times can be adjusted using the following shortcuts:
- Option Command < - Subtracts 1 second from the start time, adjusting start time to the left
- Shift Option Command < - Adds 1 second to start time, adjusting start time to the right
- Option Command > - Subtracts 1 second from end time, adjusting end time to the left
- Shift Option Command > - Adds 1 second to end time, adjusting end time to the right
Sorting Rows
To sort rows in the timeline, right click on a row name and choose one of the following options from the Sort menu:
- A-Z - Sorts alphabetically
- Z-A - Sorts alphabetically in reverse
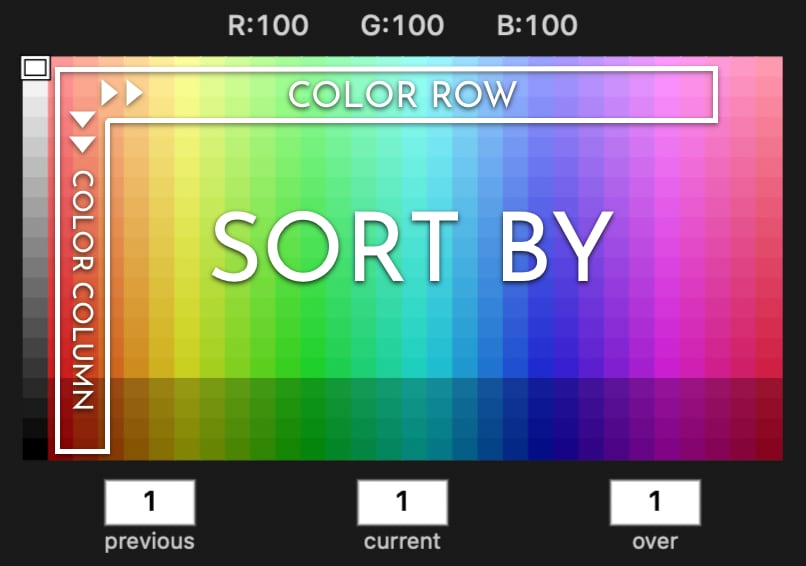
- Color Column - Sorts by color palette column from top to bottom
- Color Column, A-Z - Sorts by color palette column from top to bottom, then alphabetically
- Color Column, Z-A - Sorts by color palette column from top to bottom, then reverse alphabetically
- Color Row - Sorts by color palette row from left to right
- Color Row, A-Z - Sorts by color palette row from left to right, then alphabetically
- Color Row, Z-A - Sorts by color palette row from left to right, then reverse alphabetically
- Total Clips Ascending - Sorts by the number of clips in all rows, least amount of clips on top row
- Total Clips Descending - Sorts by the number of clips in all rows, most amount of clips on top row
Deleting Rows
To delete a row, right click on the row name and choose Selected Rows from the Remove menu.
Styling Rows and Clips
Rows and clips can be individually colored. To change a clip color, select the clip and set the color using the color palette in the inspector. To change a group of selected clips: Select the clips, hold down Command and click on one of the clips twice. This deselects and reselects it, and sets the focus of the inspector allowing the color to be applied to all clips.
To set the default row color, select the row and choose color from the inspector. This color will be used when clips are created in the row.
The row color can used as the row background by turning on full row color. Right click on the row and choose Full Row Color On.
Filtering Clips
Using Filters and Filter Patterns
Clips in a timeline or composer that contain qualifiers can be filtered in by inputting qualifiers into the filter text box in the inspector. Clips that don't match will dimmed out, vividly showing what you searching for.
The filtering works on partial matching and is very fast. If you are looking for clips with the qualifier "A1 Zone", type "A1" in the filter text input and all clips with "A1 Zone" will be filtered in to the view.
<and> <or> <not> operators can be used in the timeline and composer filter.
The operators are processed sequentially from left to right. Shortcuts for
these operators can be used too, but they must be proceeded and trailed by a
space.
&& = <and>
|| = <or>
!! = <not>
For example the filter text
a <or> c <not> b
Or
a || c !! b
is processed as follows. First the clip is assumed to be filtered in. Next clips are filtered out if ‘a’ is not in the clip. Then clips are filtered in if ‘c’ is in the clip. Next clips are filtered out if ‘b’ is in the clip.
Qualifiers can be added to a filter by right clicking on the category or qualifier in the clip qualifier editor in the inspector and choosing Add To Filter. This will insert the text into the filter. When this option is chosen for a second time, "&&" will be inserted between the first and second filter additions. This is the AND operator and means that both items must be found in the clip in order to match the filter.
To clear filter text, delete all the text in the filter input or choose Clear Filter Text from the Filter menu in the timeline or composer toolbars.
Cutting Clips
Clips can be quickly exported from the timeline. Refer to cut clips in export section
Star Rating Clips
Clips can be given a star rating from 0 to 5. Pressing the plus key will bump the star rating up, pressing the minus key will bump the rating down. This feature will work on selected clips in the timeline and composer. It is especially useful in the composer because the clips can be sorted by their rating. Also, star rating can be filtered.
Clip Notes
Note editor section of the inspector.

Movie with 4 note types in the overlay.
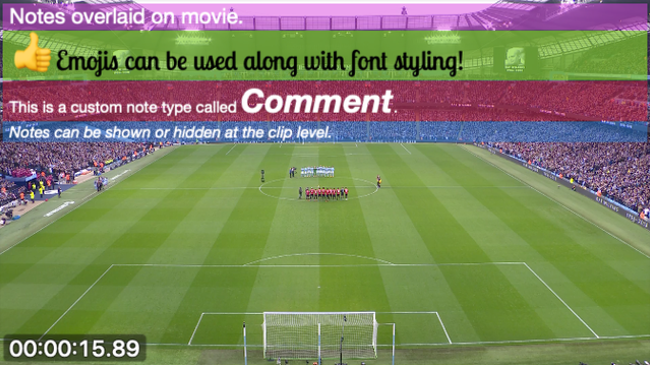
Notes can be added to clips in the timeline and composer that will appear in a block overlaid on top of the movie collection.
When a clip is selected, notes can be edited in the inspector.
Inputting a note
There are two ways to input a note in a clip:
- Select a clip, then input the note in the inspector.
- Press Control N, then input the note in the clip details popup.
Font style can be set using the standard Fonts window, choose Format > Show Fonts in the main application menu bar or press Command T to show the Fonts window.
Emojis and other characters can be used too: choose Format > Emojis to open the Characters Viewer or press Control Command Space Bar.
Once text is inputted into a note, it can be edited in the movie collection by clicking on the note in the note overlay block.
The note overlay block can be scaled by mouse hovering over the note block overlay in the movie collection, then scroll up or down using the mouse wheel or track pad gesture.
Note overlay block background opacity can be set by holding down Command, mouse hovering over the note row in the note block overlay, then scroll using the mouse wheel or track pad gesture.
Notes can be hidden for clip by selecting Off in the display setting of the note row of the inspector. To show them, select Collection in the display setting menu.
To delete a note, choose Delete Note from the note menu. Also, when a note type does not have any text, it will not be displayed in the overlay block.
Note Types
By default, there is one note type called note. Multiple types can be added for different purposes.
To add a new note type, choose Add A New Note Type from the notes menu in the inspector.
The background of the note type can be chosen by clicking on the color picker in the note row of the inspector.
Pressing Tab, will jump the text cursor down to the next note type.
Quick Zooming
Pressing Control Z will toggle between two zoom views, zoomed in and out. To set the Zoomed In view, zoom the timeline or composer in to a point that show the clips in closer detail, then right click on the Zoom In button in the toolbar and select "Remember Zoom". Set the Zoomed Out view to show more clips, then right click on the Zoom Out button in the toolbar and select "Remember Zoom". Pressing Control Z will now toggle between the two settings for all timelines and composers.
Joining Timelines
Timelines can be joined by selecting timelines in the files list, right clicking on a selected timeline, then choose Join N Timelines. N will be the number of selected timelines.
Archiving Clips
Archives are a great way of building up set of clips in one timeline. This feature is also handy for trimming down unwanted video or combining two or more portions of video into one.
To use: Create an empty timeline and movie collection using the Movie + Timeline icon in the main window toolbar, name the new collection and link the timeline. The timeline will be linked automatically, but linking it again will rename the timeline using the name of the movie collection. With the new archive timeline ready to go, select some clips in a source timeline and drag from the Archive icon in the source timeline to this newly created timeline in the files list. Continue to archive clips from other timelines to build the archive.
Clips can be archived to the start of an archive timeline by holding down Command when dragging from the Archive icon in the source timeline toolbar. This is a great wrinkle to the feature that allows you to order clips by most recent at the start of the archive timeline.
The archiving process is queued and background threaded, so you can continue to archive clips even while other clips are being processed.
MarkUp
Our term MarkUp refers to marking up data about a movie in a timeline. Data is marked in the timeline by pressing buttons down and/or up that you create according to your requirements and desired outputs.
Buttons
All button types share the following properties:
Name - This is the name of the button that will appear on the button or mark data in the timeline. Ticking the hide option will hide the name of the button.
Category - This is the category for the name and should always be used for qualifiers and attributes. It helps with sorting and filtering in timelines and composers and is important in matrices and tables for column headers.
Font Size - Sets the font size for the button name.
Font Color - Sets the font color for the button name.
ShortCut - Keyboard shortcut that is assigned during MarkUp mode. Click on the empty box to input a shortcut. Multiple modifiers can be used, e.g. Shift Control A. Hit the X button next to the shortcut input box to clear the chosen shortcut. The show tickbox will show the shortcut on top of the button.
Button Color - This is the visual color of the button.
Same - This tick box can be unselected in order to have the button color be different than the color that is marked in the timeline by the button.
Mark Color - This is the marked color of the clip, qualifier or attribute.
MarkUp Sharing
MarkUp files can exported and imported, so they can be shared with other users.
To export a MarkUp, select Copy MarkUp to Desktop from the menu in the MarkUp toolbar. The file will appear on the desktop. If you are going to email, message, WhatsApp or other sharing platform it, be sure to zip it up by right clicking on the file and choosing the compress option.
To import a MarkUp, create a new MarkUp, then drag and drop the file onto the new MarkUp.
Clip Buttons
Clip buttons mark clips in the timeline based on the duration that the button is pushed down and then up. Pushing a clip button down begins to mark a clip, pushing the same button up ends the clip.
Clip Button Options
Fill - If selected, an empty row with button name and color will be created when MarkUp mode is engaged.
Block Qualifiers - If selected, no qualifiers will be inserted into clips created by the button.
Pinger - This option produces a visual effect when the button is pushed down. The effect stops when the button is pushed up.
Merge Clips - If selected, clips that overlap will merge into one clip. This is often useful when clip buttons have a negative Time Down that would create an overlap to previous clip.
Up Note - If selected, a note popup window will appear when the button is pushed up.
Down Note - If selected, a note popup window will appear when the button is pushed down.
Qualifier Buttons
Qualifier type buttons add description to a clip. When a qualifier button is pushed down while a clip button is down, the qualifier will be inserted into the clip. This gives you the ability to filter for clips that have that qualifier contained in them and provides data for matrices.
Qualifiers have a time attribute to them as well. This time is stamped when the button is pushed down. This can be helpful marking exactly when a moment occurred in the movie. Also, this time attribute opens up some interesting data analysis opportunities.
Attribute Buttons
None Buttons
The None type is used for buttons that do not mark the timeline. This is often for graphical details such as backgrounds.
MarkUp Creation
When you are creating a MarkUp view, we recommend watching a movie that contains content you want to mark up. Reviewing some footage will spark ideas on what data you want to collect. As you see something you may want to mark and review, add a button to a MarkUp view.
To create a MarkUp, click the plus button in the upper right corner of a pane and select Add a MarkUp tab. Be sure to give the MarkUp a name in the inspector. You will re-use this MarkUp, so giving it an identifiable name is important.
To create a button, click the New Button item in the MarkUp toolbar, choose a color by clicking on the color chip in the popup menu, then click and drag a button shape from the pop up menu. Continue to drag button shapes, click on the MarkUp canvas to close the menu.
Edit the button properties by selecting it and making the changes in the inspector in the right sidebar.
Aligning Buttons
Buttons can be aligned by using the alignment options found under the right click menu when two or more buttons are selected. The alignment works by selecting two or more buttons, then right clicking on the button that you want the other buttons to align or equalize with.
The alignment options:
Top - Aligns the top edge of all selected buttons with the top edge of the chosen button. Left - Aligns the left edge of all selected buttons with the left edge of the chosen button. Bottom - Aligns the bottom edge of all selected buttons with the bottom edge of the chosen button. Right - Aligns the right edge of all selected buttons with the right edge of the chosen button. Equalize Height - Equalizes the height of all selected buttons with the chosen button. Equalize Width - Equalizes the width of all selected buttons with the chosen button. Equalize Width and Height - Equalizes the width and height of all selected buttons with the chosen button. Center Vertically - Vertically aligns all selected buttons along their center with the chosen button's center. Center Horizontally - Horizontally aligns all selected buttons along their center with the chosen button's center. Center - Aligns all selected buttons using the buttons center. This, basically, stacks all selected buttons on top of each other. Space Evenly Horizontally - Spaces all selected buttons evenly using top most and bottom most buttons. Space Evenly Vertically - Spaces all selected button evenly using the left most and right most buttons.
MarkUp Modes
A red triangle indicates which mode is active. By default, a MarkUp is in Edit mode.
Edit mode indicates that buttons in the MarkUp view can be edited.
MarkUp mode indicates that buttons in the MarkUp view will mark up the timeline.
Qualifier is pseudo-mode that automatically engages itself when a clip in the timeline is selected while in MarkUp mode. The white clip cursor will appear on top of the clip and a qualifier button can be pressed to insert into the clip at the clip cursor location. Pressing the qualifier button again will expunge the closest same qualifier. To insert multiples of the same qualifier, hold down Command while pressing down the qualifier button.
Graphic Buttons
Images can be used as buttons by copy pasting from other applications or drag dropping an image file onto the MarkUp canvas. PNG is the preferred format, however PDF and JPG formats are supported.
If you are looking for a custom shape, you can copy and paste from most graphical editors like Photoshop or Pixelmator, even Pages and Keynote work.
Button Timings
There are 3 markup timing adjustments that can be set for buttons in the inspector:
Time Down, Time Up and Auto Up.
Using these time adjustments can greatly reduce markup input time and post event clip editing.
Time Down
When the button is pushed down the time will adjust the clip start time. This value can negative or positive. Generally, this value will be negative and is commonly used in conjunction with Auto Up.
Time Up
When the button is pushed up the time will adjust the clip end time. This value can negative or positive. Generally, this value is not used very often and should not be confused with Auto Up.
Auto Up
This setting will push the button up after the set time. It is handy to use this setting to create a clip using a one button push. This value can negative or positive. Generally used to create short clips tracking statistics actions and counting. Rarely should this value be negative. If it is negative, then the Time Up adjustment should be used.
Button Actions
Buttons can trigger actions based on different conditions. Buttons can push other buttons up or down or move to a different area of the MarkUp canvas.
Down > Up and Up > Down Button Actions
▶︎ Down > Up - When the button is pushed down, this action triggers the linked button to push up.
▶︎ Up > Down - When the button is pushed up, this action triggers the linked button to push down.
Down > Down and Up > Up Button Actions
▶︎ Down > Down - When the button is pushed down, this action triggers the linked button to push down.
▶︎ Up > Up - When the button is pushed up, this action triggers the linked button to push up.
Down-Up > Center Button Actions
● Down > Center - When the button is pushed down, this action triggers the MarkUp canvas to center the linked button.
● Up > Center - When the button is pushed up, this action triggers the MarkUp canvas to center the linked button.
Up-Down > To Front-Back Actions
 Down > To Front - When the button is pushed down, all linked buttons will be
pushed to the front most layer of the MarkUp.
Down > To Front - When the button is pushed down, all linked buttons will be
pushed to the front most layer of the MarkUp.
 Down > To Back - When the button is pushed down, all linked buttons will be sent
to the back most layer of the MarkUp.
Down > To Back - When the button is pushed down, all linked buttons will be sent
to the back most layer of the MarkUp.
 Up > To Front - When the button is pushed up, all linked buttons will be pushed
to the front most layer of the MarkUp.
Up > To Front - When the button is pushed up, all linked buttons will be pushed
to the front most layer of the MarkUp.
 Up > To Back - When the button is pushed up, all linked buttons will be pushed
to the front most layer of the MarkUp.
Up > To Back - When the button is pushed up, all linked buttons will be pushed
to the front most layer of the MarkUp.
 Down > Button Color - When the button is pushed down, all linked buttons button
color will be changed to the selected color.
Down > Button Color - When the button is pushed down, all linked buttons button
color will be changed to the selected color.
 Up > Button Color - When the button is pushed up, all linked buttons button
color will be changed to the selected color.
Up > Button Color - When the button is pushed up, all linked buttons button
color will be changed to the selected color.
 Down > Mark Color - When the button is pushed down, all linked buttons mark
color will be changed to the selected color.
Down > Mark Color - When the button is pushed down, all linked buttons mark
color will be changed to the selected color.
 Up > Mark Color - When the button is pushed up, all linked buttons mark
color will be changed to the selected color.
Up > Mark Color - When the button is pushed up, all linked buttons mark
color will be changed to the selected color.
Private Button Actions
◼︎ Private links restrict qualifiers or attributes from only being attached to a linked clip or qualifier. For example, if a qualifier is linked to a clip, the qualifier will only be inserted in that clip or any other clip buttons to which it is connected.
Conditional Button Actions
◀︎●︎ Down < All Up - This action sets up a condition where the button will push itself down when the list of buttons are all up.
◀︎●︎ Down < All Down - This action sets up a condition where the button will push itself down when the list of buttons are all down.
◀︎●︎ Up < All Up - This action sets up a condition where the button will push itself up when the list of buttons are all up.
◀︎●︎ Up < All Down - This action sets up a condition where the button will push itself up when the list of buttons are all down.
To add an action to a button:
- Select a button and press the Plus button in the Actions section of the Inspector in the right hand sidebar.
- Choose the action from the drop down menu.
- Click and drag from the coloured indicator shape of the action to link the target button. The button name will appear in the linked drop down menu to the right of the action. Repeat to link more buttons to the action. The number of buttons linked to the action is displayed to the right of linked menu.
To unlink a button from an action, hold down Command and click on the link drop down menu. Unlink will appear before the button name, click on the button name to unlink it.
To remove an action, right click on the coloured indicator shape of the action and choose remove action.
Action links can be displayed by pressing the Actions button in the MarkUp toolbar. This animated display will show the selected buttons action links. If no buttons are selected, all links are displayed. This button is also located in the Action section of the inspector. The animation can be paused by pressing down CONTROL. This can be very helpful when working on complex action linking.
MarkUp Jumping
Buttons can trigger a focus shift from one markup view to another, we call this a jump.
Composers
The composer is a flexible container to sequence clips, titles and animations for creating presentations. The playback of the composer is linear.
Topics are used to organise clips in your composer. Topics can easily be re-ordered by drag dropping the topic up or down.
A clip can be copied to a composer from a timeline or another composer by holding down Option then click dragging the clip into a position in a topic row. Clips can also be pasted from a timeline using these shortcuts:
Option Command V pastes the clip that has the clip cursor over it at the end of an existing topic.
Option Control Command V pastes the clip that has the clip cursor over it into a new topic.
Option Command B pastes selected clips into the last selected composer.
Option Control Command B pastes selected clips into new topics into the last selected composer.
Option Command N pastes each selected clip into numbered topics, one clip per topic.
Another convenient method to copy clips is to use the right click menu on a timeline row name, timeline clip or composer clip. All selected clips can be sent to any open composer using the following options: - New topic in composer - An existing topic in a composer - A new numbered topic in a composer - A specific topic in a composer
Moving Clips
Hold down Option to move clips.
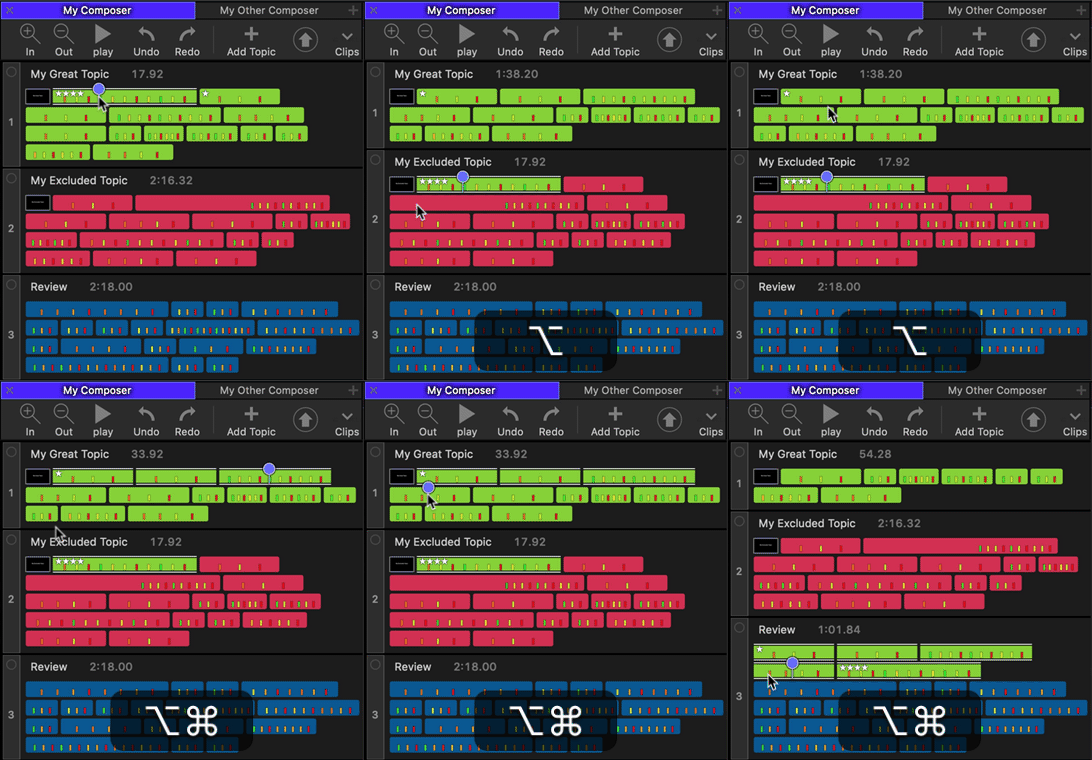
To move a clip to a different position or topic, hold down Option and click drag drop to desired position.
Trimming Clips
To edit a clip's start or end time, hold down Shift and click drag from the leading or trailing edge of the clip.
A selected clip can also be edited using shortcuts. Pressing Shift and the Left or Right arrow will engage the editing control, continue holding down Shift and use the Left and Right Arrows to alter the timing of the clip.
To trim the start time of a selected clip press Control I. To trim the end time of a selected clip press Control O.
Control T trims the closest start or end time of a selected clip according to the location of the clip cursor.
The duration of the composer appears in the inspector and can be seen in the trimming popup when adjusting the start and end times for a clip.
The duration of each topic appears after the topic name. If there are selected clips in the topic, the duration of the selected clips appears.
Exclude Topics
Click the exclusion button to exclude topics from being played or exported.
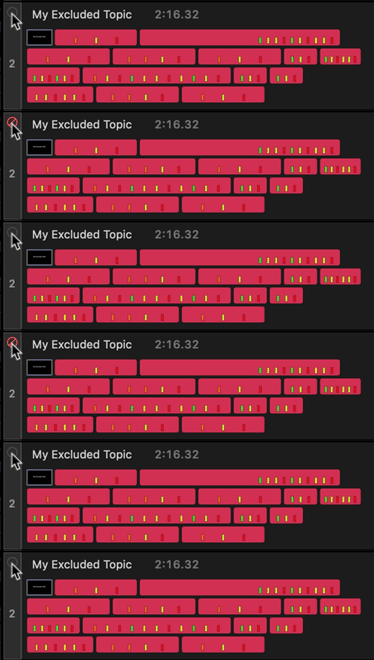
Topics can be excluded during playback or export by clicking on the exclusion button above the topic row number.
Exclusion for all topics can be toggled by holding down Option and clicking on the exclusion button.
Importing Titles and Animations
Titles can be created in a wide variety of apps and drag dropped into a topic. An image file like a png or jpeg can used or an animation movie can be used.
For the best results, be sure to create the titles and animations using a 16x9 aspect ratio.
Splitting Clips
Splitting and Annotating Clips
Clips can be split in the composer or timeline by right clicking on the clip and selecting an option in the Split Clips menu. The options are:
- Split Clip At Playhead
Splits the clip at the playhead location into two clips. - Split Clip At Playhead And Insert Picture Clip
Splits the clip at the playhead location into two clips and inserts a picture clip of the frame at the split. - Insert Picture Clip At Start
Inserts a picture clip at the beginning of the clip using the first frame of the clip. - Insert Picture Clip At End
Inserts a picture clip at the end of the clip using the last frame of the clip.
Annotating Picture Clips
Right click on a picture clip and choose annotate to open the picture in an image editor. Using an external app like Photoshop to draw on pictures opens up the toolkit to create cool picture clips.
By default, the image will be opened in the Preview app. Save the file
Sorting Clips
The composer has several sorting options that can be found by right clicking on a clip in a topic row.
- Sort Stars 0 to N - Sorts clips in the topic in ascending order. N will be the highest star rating found in one of the clips in the topic.
- Sort Stars N to 0 - Sorts clips in the topic in descending order. N will be the highest star rating found in one of the clips in the topic.
- Sort Stars For All Topics Ascending / Descending - Sorts clips in all topics: ascending will sort by lowest rating(0) to highest and descending from highest rating to lowest(0).
- Sort Topic By Timeline Clip Start Time - Sorts all the clips according to the clip's start time in the origin timeline.
- Sort All Topics By Timeline Clip Start Time - Sorts all the clips in all topics according to the clip's start time in the origin timeline.
- Sort Topic By Movie Then By Timeline Clip Start Time - Sorts all clips by the movie and then sorts the clips by their start time.
- Sort All Topics By Movie Then By Timeline Clip Start Time - Sorts all clips in all topics by the movie and then sorts the clips by their start time.
Refer to Star Rating Clips in the timeline section
Removing Data From Clips
Stars, notes, qualifiers and attributes can be removed by selecting the clips and choosing the option found in the Remove options under the right click menu.
Coloring Clips By Movie
Colorizing Clips
The color for all clips from the same movie collection can be set across a topic or all topics. This is really helpful to distinguish between clips from different movies.
To use:
- Click on a clip and set a clip color in the inspector.
- Right click on the clip and navigate to Color in the menu.
- Choose 'Set Clips From Movie To This Color In Topic'
All the clips from the same movie will appear with that color. Great to use in conjuction with Sort Topic By Movie Then By Timeline Clip Start Time.
Flash Clips
To quickly identify other clips from the same movie collection:
- Right click on a clip.
- Navigate to Color menu.
- Choose Flash Clips From Movie.
All the clips from the same movie collection will flash twice.
Relinking Clips to Movies
There are occasions where clips in a composer need to be linked to a different movie collection. To relink clips, drag from the Link button in the Movie Collection toolbar to the clip. All clips in the composer that are linked to a like movie will be highlighted, letting go will prompt to link the clips to the new movie collection.
Composer Matrix Export
A matrix csv can be exported from the composer by choosing Export Composer Matrix from the export menu in the composer toolbar.
Filters
Filters are one of the really cool features in Angles.
Filters filter using qualifiers found in the clips using patterns.
Filtered out row hiding in timeline.
Imports
SportsCode XML Import
Importing XML Data and Syncing The Timeline Clips
A common data interchange format between online and desktop editing tools is SportsCode XML.
To import, drag drop a SportsCode XML onto a timeline.
There are 2 options for handling how clips are merged:
- Keep Overlaps When Merging Clips
- Keep overlaps will not merge overlapping clips together, this is often helpful when using the clips for statistical purposes, keeping each discrete clip in tact. This feature is very useful for creating clip data to be used in inter-rater reliability data collection.
- Remove Overlaps When Merging Clips
- Remove overlaps is the default behaviour for handling the merging of clips. This option will merge overlapping clips into one, often better for playing clips and using them in composers.
These options are found under the Options menu in the timeline toolbar.
Synergy
Synergy Sports Import
Drag drop Synergy edit folders onto the Files List in the left sidebar. This will import clips into timelines based on the movies in the edit's video folder and data found in the export.csv file for the edit.
The Synergy edits folder can be found in the user's Documents/SynergySports/SYNERGY-USER/MyEdits folder.
The import has the following options:
If a timeline is open and the front-most tab, an extra import option be in the import dialog.
Append each edit to the timeline 'This Timeline' and 'This Collection'
This appends the imported edits to the front-most timeline and collection. It is great to use to add edits to an existing timeline.Create an individual timeline and collection for each edit
This option creates separate timelines and collections for each of the imported edits.Create a new timeline and collection, then join all edits with the name
This is the default selected option. It creates a timeline and collection, then joins all the edits in the timeline using the name provided.Convert to 1280x720 or 1920x1080
Select a frame size setting for the video to be imported.
Exports
Movie Exports
Cut Clips
Selected clips from the timeline or composer can be quickly exported to a chosen folder. To setup the export options, choose Cut Clips > Settings under the Export button in the toolbar.
The options are:
- Single movie for row
- Creates a single movie with the row name with all selected clips from the row in the movie using the row name as the movie name.
- Individual movies for clips
- Creates individual clips for every selected clip using the row name and clip number as the movie name.
- Separate angles
- Creates an individual movie for each angle in the clip using the angle name, row name and clip number as the movie name.
- Sequence angles
- Creates movies where each angle is sequenced and ordered by location and size in the movie collection.
- Use Note As File Name
- This includes any notes in the clip as part of the filename. When there are multiple note types, they will be concatenated. Note that file name length limit is 255 including the file extension, so notes could be truncated.
- Prepare For Telestration
- This option aids in cutting clips so that they might work best in telestration software such as Coach Paint, Piero or Tactic.
- H264 1920 x 1080
- This option re-encodes the clips using H264 codec with a bit rate of 6Mbps and frame resolution of 1920x1080.
The options are saved as preferences and will be used every time the feature is invoked. The shortcut is Command E.
Cut Clips to VLC
Selected clips from the timeline can be quickly exported to the VLC mobile app for iOS and Android.
The preferences for the export use the same preferences as the Cut Clips to a folder found under the export button in the timeline toolbar.
The preferences for the VLC app address can be set by clicking on the cog icon in the timeline toolbar. Input the address shown in the Sharing via WiFi preference, do not include https://, only use the address or bonjour name.
It is best to use the bonjour name, so when networks change, the IP address will likely change, but the device name will not.
Each timeline can have a different device address, but only one device can be exported to from a timeline.
Single Angle With Notes
This export renders the clip notes and/or composer topics into a new movie. It is what we call a "what you see is what you get" feature, this means that whatever display options are turned on in the clip will be included in the exported movie. So, if you have one clip with a specific note type viewable and the next clip with a different note type viewable, the exported movie will reflect these perfectly.
The export settings include:
- Include Notes
- Includes the notes overlaid in the movie.
- Include Composer Topics
- Includes composer topics in the movie.
- Open Movie
- Opens movie in Quicktime Player when the export is complete.
- 1280 x 720, 4 Mbit
- Exports movie with a framesize of 1280x720 at 4 Mbits/sec.
- 1920 x 1280, 6 Mbit
- Exports movie with a framesize of 1920x1080 at 6 Mbits/sec.
- 1920 x 1080, 3 Mbit HEVC
- Exports movie with a framesize of 1920x1080 at 3 Mbits/sec using HEVC * For machines that support HEVC hardware.
- Minimal conversion (faster)
- Exports a movie based the movie characteristics found in the source movies, this export can result in a large sized movie file.
- The directory that is selected will become the preferred location for the exported movie.
Text Data Exports
CSV Matrix Export
CSV Matrix Export
The timeline and the composer can export a 2 dimensional table called a matrix. Each row of the matrix contains clip name and each column contains qualifiers. The intersection cells of the rows and columns show a count of the clips that contain the qualifier.
The export has several options:
- Include categories
- This option organizes the qualifiers by their categories in alphabetical order.
- Remove rows where all values are 0
- When a row does not have any qualifiers, it will not be included in the export.
- Remove columns where all values are 0
- When a column does not have any qualifiers, it will not be included in the export.
- Open file when this save is completed
- The file will open in "Microsoft Excel" or "Numbers" spreadsheet editors.
- Resave this file every time its source is modified
- Use this option to continually update the file when using it as a data source for a graph or other workflow.
- Tab or comma delimited choices
- Uses a tab or comma to separate the data in the rows.
Qualifier CSV Table Export
A CSV file can be exported from a timeline or composer. Each row in the csv is based around a qualifier and includes the clip details, cartesian coordinates, and qualifier attributes.
XML Export
A common data interchange format between online and desktop editing tools is the SportsCode XML. There are two options:
- Copy Timeline As Legacy XML Edit List To The Desktop
- Exports an XML that matches the SportsCode XML.
- Copy Timeline As XML Edit List To The Desktop
- Exports an XML that is similar to the SportsCode XML, but with more data. The qualifier color and time are included in the label tags.
To export: Choose Copy Timeline option from the menu in the timeline toolbar.